First-run wizard
The first time you launch Hyveon, the app replaces its entire window with a five-step setup wizard. There is no sidebar, no dashboard, and no way to skip it — until the wizard finishes, the app has no Terraform state backend to talk to and nothing else would work.
The header reads Welcome to Hyveon, with a subtitle showing
Step N of 5: <step title>.
| # | Step | What it does |
|---|---|---|
| 1 | Install prerequisites | Checks that terraform and the aws CLI are on your PATH |
| 2 | Choose your cloud | Picks the cloud provider (AWS only, today) |
| 3 | AWS credentials | Picks an AWS profile, or stores pasted access keys |
| 4 | Bootstrap AWS resources | Creates the S3 state bucket, DynamoDB lock table and S3 tfvars bucket |
| 5 | Finish setup | Runs terraform init against that new backend |
At the bottom of every step: Back (disabled on step 1) and Next. Step 5 has no Next — it has its own Finish setup button instead.
Step 1 — Install prerequisites
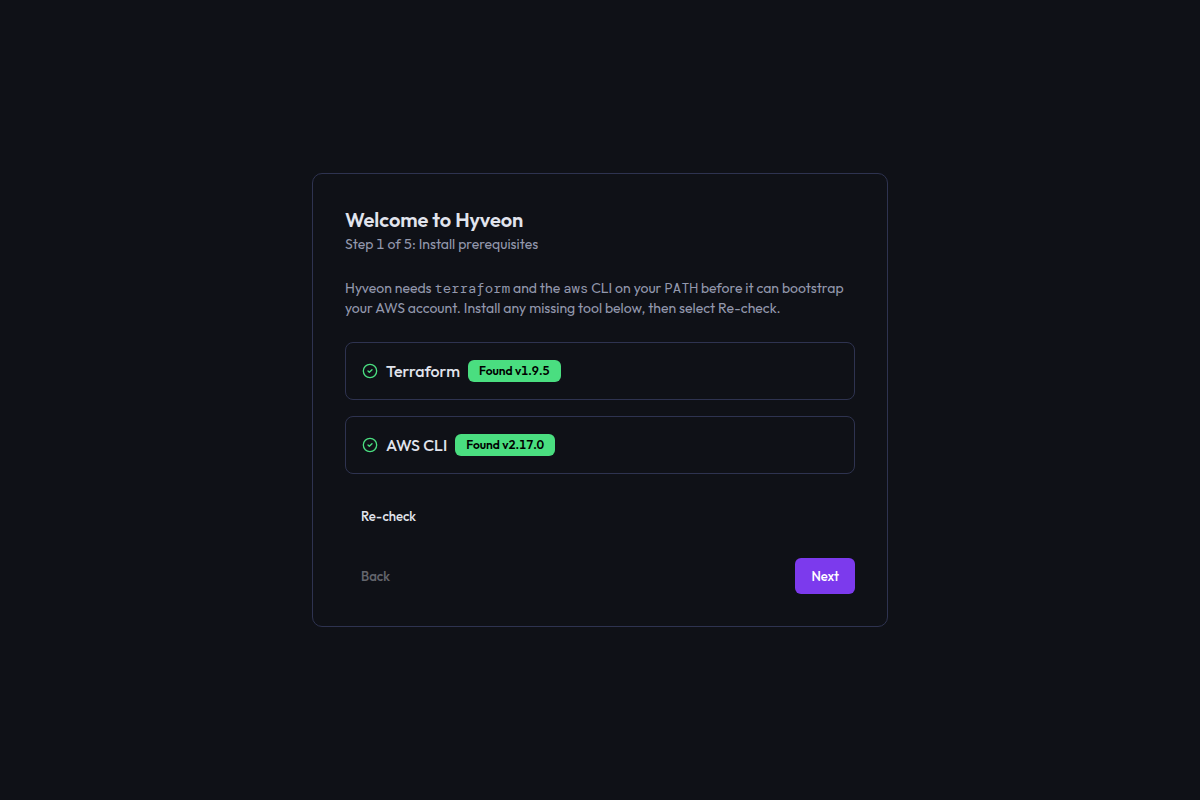
Hyveon needs
terraformand theawsCLI on your PATH before it can bootstrap your AWS account. Install any missing tool below, then select Re-check.
The app locates each binary (which on macOS/Linux, where.exe on Windows)
and asks it for its version. Each probe has a 10-second timeout.
| Tool | Version command | Minimum |
|---|---|---|
| Terraform | terraform version -json | 1.5.0 |
| AWS CLI | aws --version | none — presence only |
Each row shows one of:
| State | Badge | Extra UI |
|---|---|---|
| Found and satisfies the minimum | green Found v1.9.5 | — |
| Found but below the minimum | amber Found v1.4.2 | "Version 1.4.2 is below the minimum supported version. Please upgrade." plus install instructions |
| Not found | red Not found | Install instructions for your OS plus an Install guide link |
| Still checking | Checking… | — |
Install instructions are OS-specific and are only shown when a tool is missing or out of date. On macOS:
brew tap hashicorp/tap && brew install hashicorp/tap/terraform
brew install awscli
On Windows, Terraform's instruction is:
winget install Hashicorp.Terraform
Linux users are pointed at their distro's package manager or the vendor install guide.
What blocks Next: Terraform must be found and must not be explicitly below the minimum; the AWS CLI must be found. A Terraform build whose version string cannot be parsed is allowed through rather than blocking you.
If the check itself fails (rather than a tool being missing), a red alert appears with the error message. Install what is missing, then press Re-check — nothing is cached, so every press genuinely re-probes.
Step 2 — Choose your cloud
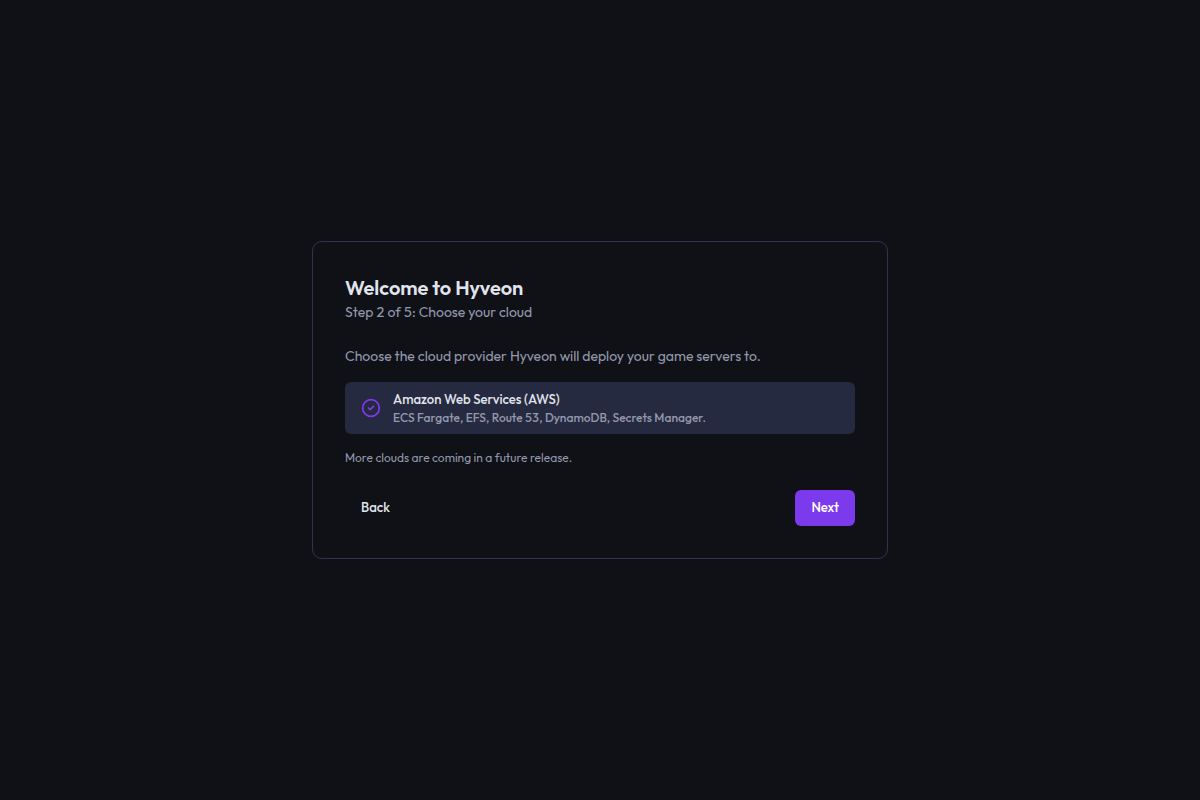
Choose the cloud provider Hyveon will deploy your game servers to.
One option today — Amazon Web Services (AWS), described as "ECS Fargate, EFS, Route 53, DynamoDB, Secrets Manager" — and it is pre-selected. A footnote reads "More clouds are coming in a future release."
Nothing blocks Next. Clicking it saves your choice; if that save fails, an error appears and you stay on the step so nothing silently drifts.
Step 3 — AWS credentials
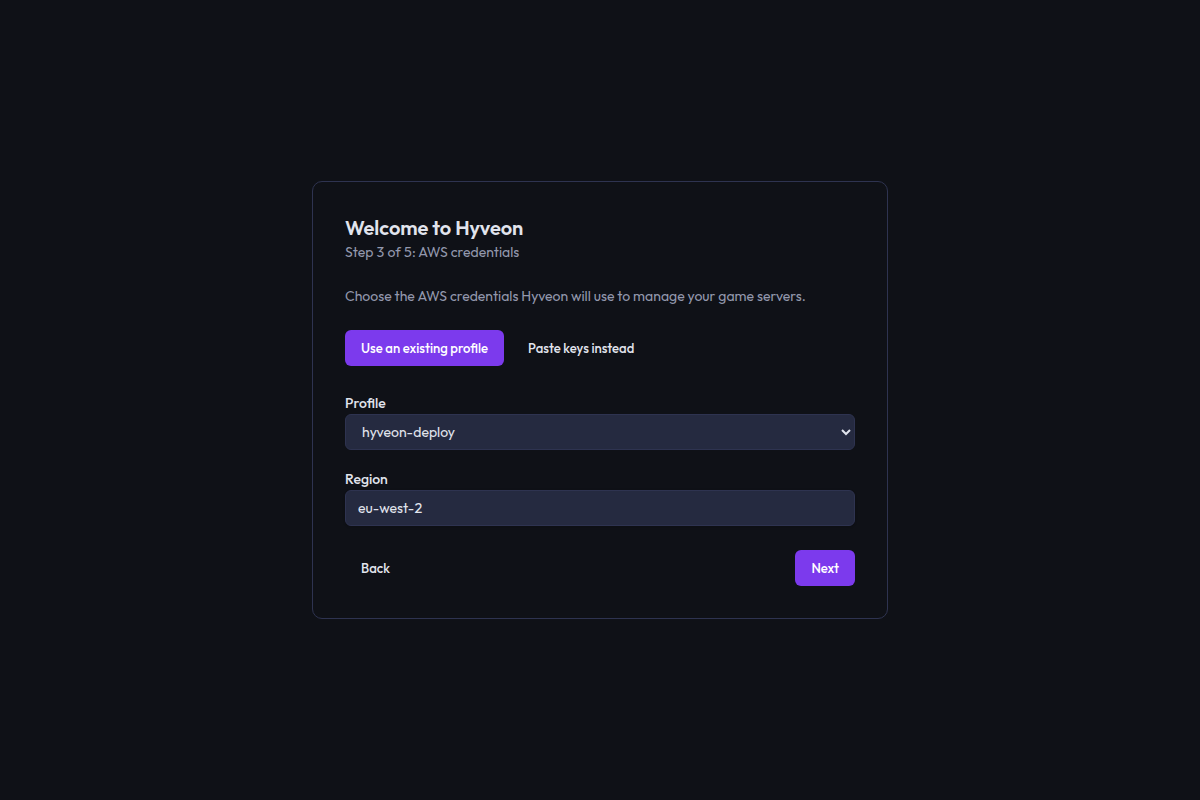
Choose the AWS credentials Hyveon will use to manage your game servers.
Two modes, chosen with a pair of toggle buttons.
Use an existing profile (default)
The app reads your AWS CLI config and lists the profiles it finds.
| Field | Notes |
|---|---|
| Profile | Dropdown, placeholder Select a profile… |
| Region | Text, placeholder us-east-1. Auto-filled from the selected profile's own configured region, and freely editable |
While the profile list loads you see "Loading AWS profiles…". If there are none:
No AWS CLI profiles found on this machine. Use "Paste keys instead" below.
Paste keys instead
| Field | Type |
|---|---|
| Access key ID | Text |
| Secret access key | Password |
| Region | Text, placeholder us-east-1 |
Press Save credentials. The keys are encrypted with your operating
system's keychain and stored under a profile named hyveon-pasted; on success
the step shows Saved as profile "hyveon-pasted".
Editing any of the three fields after saving clears that confirmation, so you must press Save credentials again before you can continue. This is intentional — it stops you advancing with keys you typed but never committed.
If your OS keychain is unavailable, the save is refused rather than falling back to plaintext:
Cannot save pasted AWS credentials: the OS keychain (safeStorage) is unavailable. Pasted keys are never stored in plaintext — pick an existing AWS CLI profile instead.
What blocks Next
- Profile mode: a profile must be selected and the region must be non-empty.
- Paste mode: Save credentials must have succeeded and the region must be non-empty.
The region is mandatory in both modes because the Terraform S3 backend has no region default to fall back on.
Step 4 — Bootstrap AWS resources
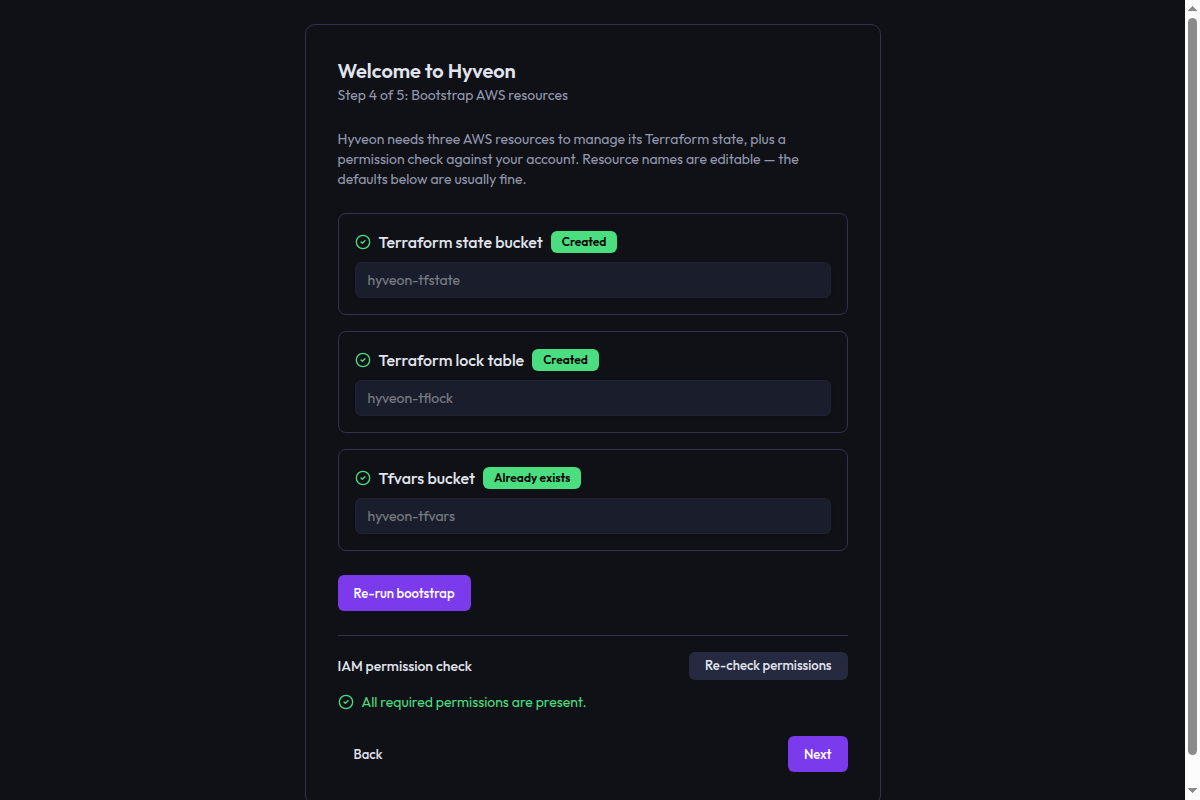
Hyveon needs three AWS resources to manage its Terraform state, plus a permission check against your account. Resource names are editable — the defaults below are usually fine.
| Resource | Default name | What it is |
|---|---|---|
| Terraform state bucket | hyveon-tfstate | S3 bucket, versioning enabled, AES256 encryption |
| Terraform lock table | hyveon-tflock | DynamoDB table, LockID hash key, pay-per-request |
| Tfvars bucket | hyveon-tfvars | S3 bucket, versioning enabled, non-current versions expire after 90 days |
These are created with the AWS SDK directly — the wizard does not shell out to
terraform or aws for this step.
Press Bootstrap AWS resources. All three are created concurrently, so one failure does not stop the others. Each row's badge moves independently:
| Badge | Meaning |
|---|---|
| Pending | Not attempted yet |
| Creating… | In flight |
| Created | Newly created by this run |
| Already exists | Found and left alone (re-configuration applied) |
| Failed | With the error message beneath the row |
Once a resource reaches Created or Already exists, its name field locks. The button relabels itself to Re-run bootstrap, which is safe to press repeatedly — versioning, encryption and lifecycle settings are re-asserted on every run.
Common failures and how to recover:
| Message | Fix |
|---|---|
The bucket name "…" is already taken by another AWS account. Choose a different name. | S3 bucket names are globally unique. Edit the name (failed rows stay editable) and re-run |
Cannot bootstrap AWS resources: no region is configured. Complete the credentials step of the wizard first. | Go Back and finish step 3 |
| A lock-table timeout | The table did not reach ACTIVE within 60 seconds. Re-run |
What blocks Next: all three resources must be Created or Already exists.
The IAM permission check is advisory
Below the resources is an IAM permission check section with a Check permissions button (it relabels to Re-check permissions afterwards).
This check never blocks Next, and it never runs on its own. You can
complete the entire wizard without ever pressing it. It exists so you find out
about a missing IAM action now rather than halfway through your first
terraform apply.
It resolves your caller identity, then asks IAM to simulate every action in
the HyveonDeployAll policy against your principal. Three outcomes:
| Result | What you see |
|---|---|
| Passed | "All required permissions are present." |
| Missing | "Some permissions are missing. Paste the policy below into your IAM user's inline policy." followed by a ready-to-paste JSON policy containing exactly the denied actions, with a copy button |
| Warning | The reason the simulation could not run (for example, your principal cannot call iam:SimulatePrincipalPolicy), followed by the full list of actions to check by hand |
The full policy, and where to put it, is documented in the setup guide.
Step 5 — Finish setup
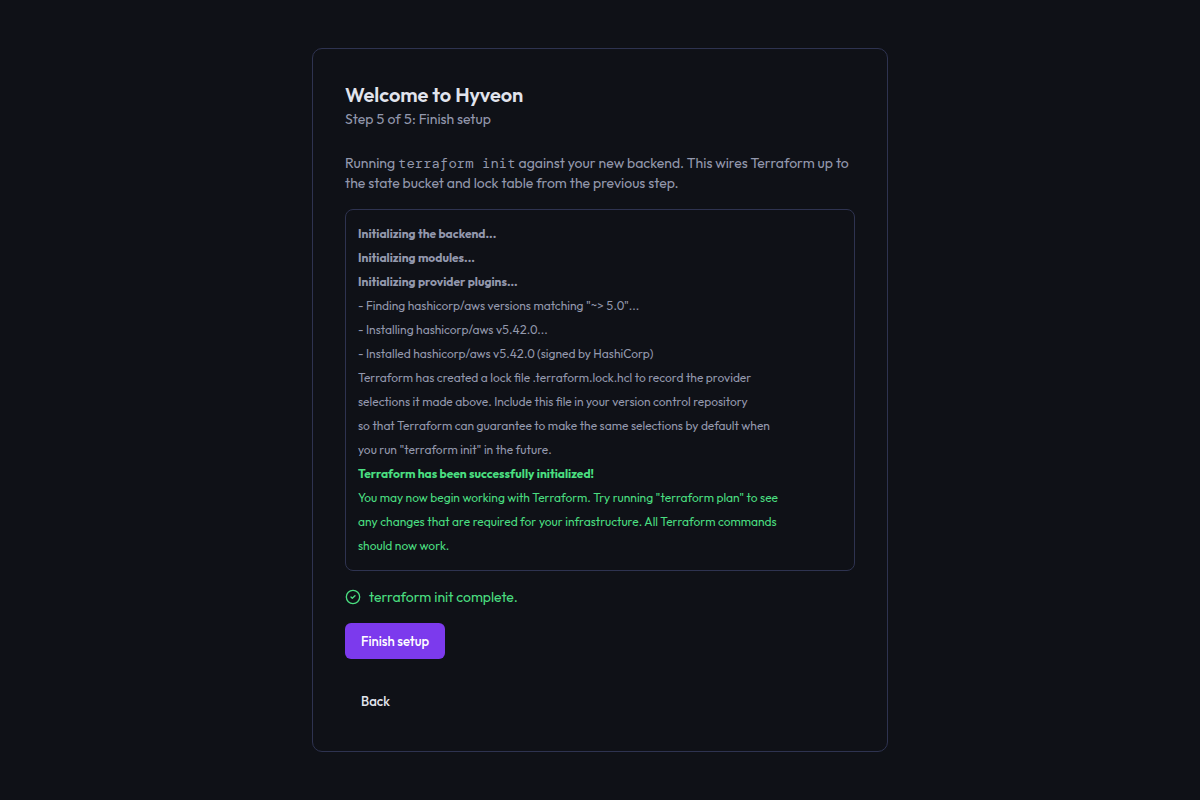
Running
terraform initagainst your new backend. This wires Terraform up to the state bucket and lock table from the previous step.
This step starts automatically on arrival — there is no Start button. It runs:
terraform init -input=false -no-color \
  -backend-config=bucket=<state bucket> \
  -backend-config=region=<region> \
  -backend-config=dynamodb_table=<lock table>
Output streams live into the log viewer. While it is empty you see "Waiting for terraform init output…".
| Outcome | UI |
|---|---|
| Running | Spinner and "Running…" |
| Success | Green "terraform init complete." |
| Failure | Red alert with the reason (or "terraform init failed — see the log above for details.") plus a Retry button |
Finish setup is enabled only once the init succeeds. Clicking it marks setup complete and drops you straight onto the dashboard.
If you press Finish setup and re-run it later, note that a re-run with an
identical backend config is skipped rather than re-executed — you will see the
single line terraform init skipped: backend config unchanged since the last successful init. Failures are never skipped, so Retry always genuinely
re-runs.
Resuming an interrupted setup
Progress is saved on every step change, so closing the app mid-wizard is safe. On relaunch you land back on the step you were on.
One deliberate exception: you never resume directly into step 5. If you
quit while terraform init was running, the app puts you back on step 4
(Bootstrap AWS resources) instead. Step 5 builds its backend configuration
from the answers held in the wizard's live state, and those answers are not
rehydrated on relaunch — resuming into it would run terraform init against
blank defaults. Landing on step 4 is safe because it reads your region from
the stored settings, and the worst case is that you press Re-run bootstrap
once more.
Two other resume caveats worth knowing:
- Only the step pointer is restored. Your region, selected profile and bootstrap resource names all fall back to their defaults on relaunch, even though they were saved. (The Reconfigure flow below does restore them.)
- If saving progress fails, you simply start from step 1 next time. Nothing breaks.
Finishing the wizard deletes the resume file.
Reconfigure
The same wizard is reachable later from Settings → Cloud Setup → Reconfigure. Use it to switch AWS profiles, change region, or re-point Terraform at differently-named bootstrap resources.
It behaves differently in four ways.
It has four steps, not five. The prerequisites check is dropped entirely —
if you are running the app, you already have the tools. The header reads
Reconfigure Hyveon and the steps are renumbered Step 1 of 4 through
Step 4 of 4.
Every step starts collapsed. Instead of a form you see a summary box:
✓ AWS credentials is already configured. [Edit]
Press Edit to expand that step's real form. Steps you never expand stay collapsed all the way through. (There is no way to re-collapse a step once expanded — press Cancel and start again if you change your mind.)
Your existing answers are pre-filled. Unlike the first-run flow, the
Reconfigure wizard reads your stored settings back: your cloud, your profile
and region, and your bootstrap resource names. This matters for the final
step, because it means terraform init targets your actual bucket and lock
table rather than the defaults.
All edits are buffered into a single save on Finish. Advancing between steps persists nothing. Only when you press Finish setup are your changes written, and only for the steps you actually expanded — a step left collapsed is omitted entirely rather than re-submitted with possibly-stale local values. There is also a Cancel button next to Back, which discards the whole session.
One thing Cancel cannot undo: the Save credentials and Bootstrap AWS resources buttons perform real work the moment you click them, exactly as in the first-run flow. If you saved a pasted key it is still in your keychain, and if you created an S3 bucket it still exists. Cancel only prevents your active configuration from being pointed at them.